

INSTALLATION INSTRUCTIONS
CAUTION: FAILURE TO FOLLOW THESE INSTRUCTIONS FOR FILTER KIT INSTALLATION MAY CAUSE INTERNAL TRANSMISSION DAMAGE!
WARNING: PLACE VEHICLE GEAR SHIFT LEVER IN PARK, SET PARK BRAKE AND VENT EXHAUST. TRANSMISSION FLUID MAY BE HOT. ALWAYS WEAR SAFETY GLASSES AND PROTECTIVE CLOTHING.
1. On new vehicles (less than 5,000 miles), it is recommended that the filter be installed on the cooler supply side to protect the cooler from contamination. On in-service vehicles (more than 5,000 miles), the filter should be installed in the return line from the cooler to the transmission. On any vehicle that has experienced any transmission difficulty, the filter should be placed on the return side.
2. Locate a section of the cooler line that has 12 inches of straight tubing or hose for filter installation in the cooler line.
3. Cut a 9 inch section of the steel cooler tubing, from the middle of the 12 inch straight section in the cooler line or a 3.75 inches of the cooler rubber hose. Clean and de-burr cut ends.
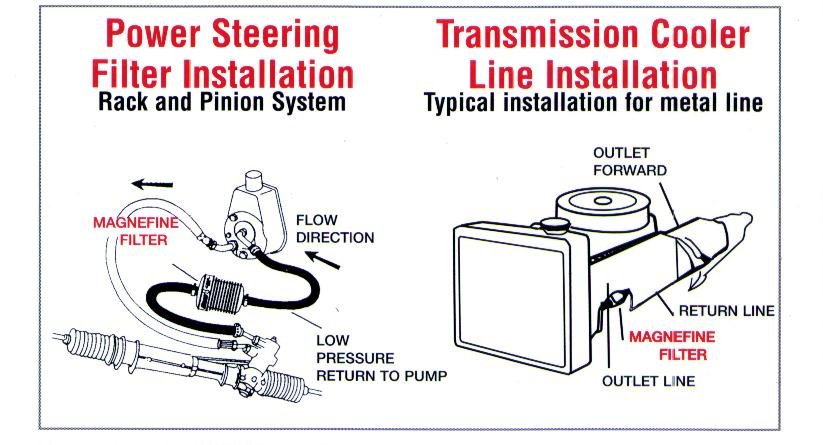
4. Assemble the filter for installation (per assembly figure). Use hose and fittings for steel tubing installation. Use filter only for rubber hose installation.
5. Steel Tube Installation: · Using the removed section of steel tubing as a pattern, make up the assembly (per assembly figure) to the same length for installation. · After cutting hose to proper length, center filter in assembly, tighten clamps securely, leaving the ferrule clamp on the filter exit side loose for flow direction verification. · Install completed assembly in cut section by seating tubing fully in ferrules. Finger tighten both ferrules and then tighten an additional 1 to 1-1/2 turns to seat the ferrule in the connector. · NOTE: Be sure the cooler tube is fully seated in the body of the fitting before final tightening of the ferrule nut.
6. Rubber Hose Installation: · Install each end of the filter into the 3.75 inch section of the cut cooler hose and secure with hose clamps.
CAUTION: THE FILTER HAS A ONE WAY VALVE WITH THE RED ARROW INDICATING DIRECTION OF FLUID FLOW THROUGH THE FILTER. THE RED ARROW MUST BE INSTALLED POINTING IN THE DIRECTION OF FLUID FLOW. IF MIS-INSTALLED, MAY CAUSE INTERNAL TRANSMISSION DAMAGE.
7. Once the filter is installed: · With the filter exit line disconnected, verify fluid flow and direction. · Connect filter line and inspect for leaks, kinks and chafe points. · Check and adjust proper transmission fluid level at normal operating range and normal operating temperature.
8. Clean a visible section of the transmission fluid pan and install the sticker (indicating the vehicle is equipped with an in-line transmission fluid filter).
Contact Us At:

800-382-7233
info@magnefinefilter.com
[Home][Magnefine][VA
Products][Vandal Alert][Online
Store]